The SAM backend databases reside on a server so that all SAM
user's PCs can share the same data. This document describes how
to accomplish this connection via mapping drive X:.
Please follow the steps outlined on the right.
Some background on SAM design

![]()
That's it! Just to confirm all is well start SAM in the usual way:
either double-click the SAM2 desktop icon (above)
or select "Start Menu \ Programs \ SAM Schools Admin 2 \ SAM 2 Schools Admin.DB".
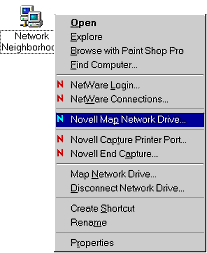
- Right-click on "Network Neighborhood", from the resulting context menu (shown on the left)...
- Select "Novell Map Network Drive" and click
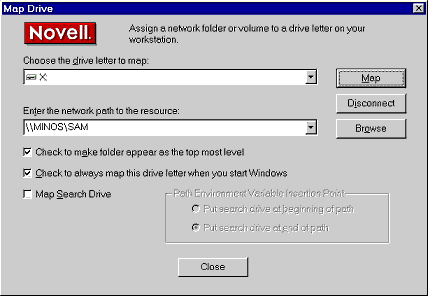
- The Novell "Map Drive" window should appear(shown below, the
exact labelling of the tick-boxes differs from version to version)...

- Select drive letter X: tab to...
- Enter \\MINOS\SAM in the "network path" field, tab to...
- Check (i.e. tick) the "top most level" (or "map root") box, tab to...
- Check the "always map" (or "reconnect at logon") box
- Press the Enter key -or- click the [Map] button...
- Confirm that the old mapping can be overwritten
- If SAM is being installed for the first time,
skip the next instruction and see the section below - Close the X: folder that will popup

SAM: Installing for the first time
- Open the X: drive folder either in Windows Explorer or My Computer
- Double-click the Program folder, ...
- Double-click the Sam2.exe application icon, ...
- Click [Unzip] (or press Enter) in the WinZip Self-Extractor window, ...
- When the files have been extracted, click [OK] (or press Enter) to remove the confirmation dialogue, ...
- Click [Close] (or press Enter) to finish.
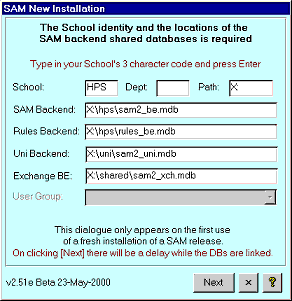
If this is a new/fresh installation the application will need to know which School you are working with. In the "SAM New Installation" form enter your School's three character code in the School field, press the Enter key. The database path fields should be automatically filled-in and will normally not need to be modified. Click [Next] or (press Enter) and your front-end installation will be linked to the backend database tables which contain the data. The progress of the re-linking process can be monitored in the status field in the bottom left-hand corner of the MS-Access window. The re-linking can take several minutes, but will not need to be done again until a new release is installed.