

- Some Background on the implementation design
- The SAM databases (in the plural)
- Step-by-step installation instructions
- The Step-by-step quick instructions/reminder
Some Background
The Microsoft Access database application that is SAM uses the technique of database splitting. This technique, in effect, divides the database application from the database data. The application, user interface (UI), aspects such as forms, queries, reports, etc. are contained in what is known as a Frontend database (FE). The real data that is stored in the many and various tables (and their relationships) is in the the Backend database (BE).
Why have this FE/BE split? The BE data resides on a fileserver so that all the application users have access to the same actual data. The FE is located on the user's PC's hard disk which means faster response in terms of loading forms. Additionally, it provides the ability to create temporary work tables for each specific user.
MS Access databases as well as being splittable in this way, can be compiled. The major advantage of a compiled database is that it performs faster. The disadvantage is that you can't go in and see the design and code, or alter it. Compiled databases have the filename extension .MDE as opposes to the usual .MDB extension for MS Access databases.
The SAM databases (in the plural)
The implementation design of SAM uses the split FE/BE technique outlined in the previous section. In fact SAM (at present) consists of a FE and three BE's.
Sam2.mde is the FE database that you will install on your PC's hard disk by following these instructions. When new releases of SAM come out it is this file that you will re-install.
Sam2_be.mde/b is the BE database that stores your School's data.
Sam2_uni.mde/b is another BE database with a very similar table structure to Sam2_be, but in this case it stores the data for all the Schools, in fact the whole University's student body. It is from this BE that you draw down any pre-existing data. This is the link between your database and the central SBS (CHA) system.
Rules_be.mde/b contains the tables required to drive the system that determines what modules can or cannot be taken on the basis of the study programme and previous qualifications or modules. It is likely in future releases of SAM that this database will be subsumed into the other BE's.
When you install a new, fresh, release of SAM it needs to know both, which School it is 'working' for, and the location in terms of fileserver and pathnames where the BE databases reside.
Step-by-step instructions
Skip to Step 2 if you are already using a networked copy of SAM.
Please refer to the updated install sheet
for first-time installation.
Step 1. Map a Network Drive
You must Map a Network Drive so that, say, drive X: is equivalent to the SAM folder on the fileserver where the shared backend databases reside. It is possible that drive X: is already mapped to somewhere else. In this case either Disconnect Network Drive or choose another drive letter to map.
There are a couple of alternative methods depending on your preference:
a) using Windows Explorer
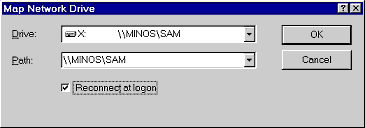
From the Tools menu, select Map Network Drive:
- enter X: in the Drive field
- enter \\minos\sam in the Path field
or for Pandora users \\pandora\sys\users\sam - check (tick) the Reconnect at logon box
- click the OK button

If drive X: was already mapped to somewhere else you'll be prompted whether to continue -- click the Yes button. You should be able to see drive X: in the left folder tree pane.
b) using Network Neighborhood
Find Minos (or Pandora) in the list of servers, if you can't see it
try double-clicking Entire Network.
If it still doesn't show up, look for a folder called NetWare Servers
and double-click it.
Once you've located the server double-click it.
Pandora users will need to find the SYS folder, double-click it, find
the Users folder, double-click it.
You should now be able to see the
SAM folder, single-click to select it, now either from the File
menu or by right-clicking the folder, select Map Network Drive.
In the resulting window (as in a) above):
- enter X: in the Drive field
- check (tick) the Reconnect at logon box
- click the OK button
Step 2. Run the install program
Again there are alternative ways of doing this:
a) If you've installed a copy of SAM since v2.30 there will be a Shortcut called Setup SAM in the Start Menu folder Start / Programs / SAM Schools Admin DB -- double-click it to run the install program.
b) Run the install program directly from Start / Run and open: X:\Program\sam2.exe and click the OK button.
c) Find the file Sam2.exe in the Program folder on drive X: by whichever method you prefer: Windows Explorer, My Computer, etc.. Double-click the program to run it.
Step 3. Extract the SAM FE and Shortcuts
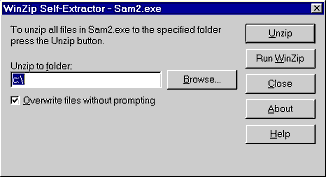
SAM is distributed as a self-extracting Zip file which contains the
SAM2 FE database and several Shortcuts.

- check the folder specified is C:\
- press Enter or click the Unzip button
- press Enter or click OK to acknowledge the unzipping
- press Enter or click the Close button to continue
The above process will result in Sam2.mde being installed in the folder C:\Program Files\Sam along with a (spare) Shortcut to run it. Additionally, Shortcuts will have been installed on the Desktop and on the Start Menu under Start / Programs / SAM Schools Admin DB. Also in that folder there will be a Shortcut called Setup SAM which you can use next time to simplify the installation.
Step 4. Start SAM for the first time
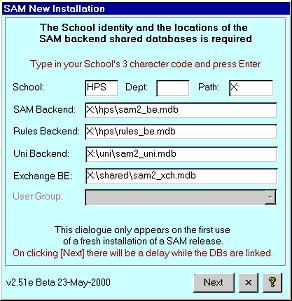
The SAM FE needs to know what School it's working for and where the various BE's are located. This is information it should only require on it's first use.
 Enter your Schools short ID code and press the Enter key.
The BE location fields should then become enabled and display the
default locations. If BE files have been relocated for some reason
you will need to edit these pathnames.
Finally, click the Next button.
There will be a longish delay while MS Access re-links the SAM2 FE to the tables in the various BE's. Eventually the main Task Focus menu should appear. You can carry on and use SAM now or click the Exit option to close it down. On the next start-up, probably via the Desktop Shortcut, SAM should go straight to Task Focus menu after successfully loading.
Step-by-step quick instructions/reminder
Assuming that SAM has been previously installed and that drive X: has been mapped to \\Minos\sam or for Pandora users \\pandora\sys\users\sam (if these assumptions aren't valid see earlier instructions):
- Start / Programs / SAM Schools Admin 2 / Setup SAM2
- check the folder specified is C:\
- press Enter or click the Unzip button
- press Enter or click OK to acknowledge the unzipping
- press Enter or click the Close button to continue
- double-click the SAM 2 desktop icon
- enter your School's 3-character ID code, press Enter
- click the Next button
- wait while Access relinks the BackEnd tables
R.D.Burnley
